How to add a password strength meter in HTML using plain HTML, CSS, and JavaScript. You’ll learn real code, UX tips, security best practices, and how to make users pick stronger passwords with confidence. Along the way, I’ll link to helpful resources (MDN, OWASP, zxcvbn, Have I Been Pwned, CSS-Tricks) so you can dive deeper.
Why does this matter?
Passwords are still the main way people protect accounts. A password strength meter gives users instant feedback, helping them create strong passwords instead of easy-to-guess ones. That reduces account takeover, support calls, and stress — while boosting trust in your product.
More importantly, a good meter doesn’t just show a pretty bar — it teaches how to make a more secure password and integrates with server-side checks (like breached-password checks). For implementation details, we’ll use simple building blocks you already know: HTML password input, a visual password bar, and a JavaScript evaluation function.
What is a password strength meter?
A password strength meter is a small UI widget that:
- Evaluates the password a user types (length, characters, patterns).
- Shows a visual cue (bar, colour, text) like Very Weak → Very Strong.
- Optionally offers hints on how to improve the password.
- Optionally checks if the password was seen in data breaches.
Good meters improve security and conversion by teaching users how to choose strong, memorable passwords. Instead of forcing complex rules blindly, they give friendly, actionable feedback. For implementation tips, see the MDN docs on <input type=”password”> and the <meter> element.
Quick demo — final result (what you’ll build)
Below is the final demo you’ll be able to create. It’s short, clear, and practical, so you can copy-paste and adapt it.
Why this helps: You get a working password strength meter HTML, CSS, JavaScript example, then we’ll break it down and show progressive improvements (regex checks, scoring, zxcvbn integration, breach checks). This covers common needs like adding a password strength meter to the form, a password strength meter for the signup form, and real-time password validation using JavaScript.
Final demo (copy-paste)
html
Copy code
<!– index.html –> <label for=“password”><strong>Password</strong></label> <input id=“password” type=“password” aria-describedby=“pwHelp” placeholder=“Create a password”> <meter id=“pwMeter” min=“0” max=“4” value=“0” hidden></meter> <div id=“pwBar” class=“pw-bar” aria-hidden=“true”></div> <p id=“pwText” aria-live=“polite”></p> <small id=“pwHelp”>Use at least 8 characters — mix letters, numbers, and symbols.</small>
css
Copy code
/* styles.css */ .pw-bar { height: 10px; border-radius: 6px; background: #eee; overflow: hidden; margin-top: 6px; } .pw-bar > span { display:block; height:100%; width:0%; transition: width 240ms ease, background-color 240ms ease; } .pw-veryweak { background: #e74c3c; } .pw-weak { background: #f39c12; } .pw-medium { background: #f1c40f; } .pw-strong { background: #2ecc71; } .pw-verystrong{ background: #27ae60; }
js
Copy code
// script.js (simple scoring) const input = document.getElementById(‘password’); const bar = document.getElementById(‘pwBar’); const text = document.getElementById(‘pwText’); input.addEventListener(‘input’, () => { const pwd = input.value; let score = 0; if (pwd.length >= 8) score++; if (/[A-Z]/.test(pwd)) score++; if (/[a-z]/.test(pwd)) score++; if (/[0-9]/.test(pwd)) score++; if (/[^A-Za-z0-9]/.test(pwd)) score++; const pct = Math.min(100, (score / 5) * 100); bar.innerHTML = `<span style=”width:${pct}%”></span>`; const span = bar.querySelector(‘span’); if (score <= 1) { text.textContent = ‘Very Weak’; span.className = ‘pw-veryweak’; } else if (score === 2) { text.textContent = ‘Weak’; span.className = ‘pw-weak’; } else if (score === 3) { text.textContent = ‘Medium’; span.className = ‘pw-medium’; } else if (score === 4) { text.textContent = ‘Strong’; span.className = ‘pw-strong’; } else { text.textContent = ‘Very Strong’; span.className = ‘pw-verystrong’; } });
This simple example covers the basics: HTML password input, password progress indicator, and password length and strength validator. Later, we’ll replace the scoring logic with a smarter engine like zxcvbn for better results.
What parts make a great password strength checker?
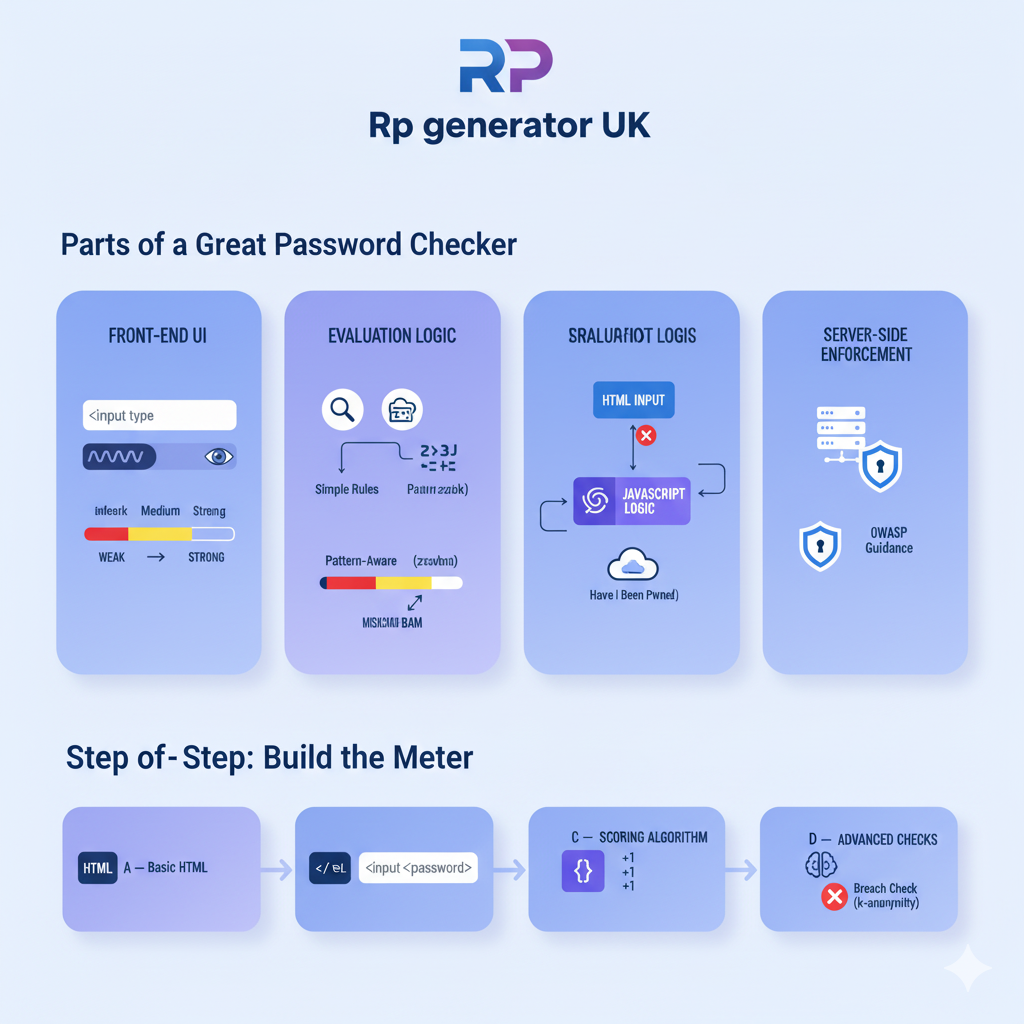
A complete password strength checker (and meter) has layers:
- Front-end UI
- Password field (<input type=”password”>) with show/hide option.
- Visual meter (bar, <meter>, labels).
- Evaluation logic
- Simple rule-based scoring (length, variety).
- Or pattern-aware engines (zxcvbn) that catch common patterns and dictionary words.
- Breach checks (optional but recommended)
- Check whether the password has appeared in public breaches (via services like Have I Been Pwned), ideally using k-anonymity so you don’t leak the password.
- Server-side enforcement
- Never rely only on client checks. The server must validate and store securely (OWASP guidance).
- User-friendly messaging
- Give short, helpful hints (e.g., “add a word or a symbol”) rather than just rules.
4) Step-by-step: build the meter (from simple to advanced)
Step A — Basic HTML password input and layout
Start with an accessible HTML snippet:
html
Copy code
<div class=“password-container”> <label for=“password”><strong>Password</strong></label> <input id=“password” type=“password” aria-describedby=“pwHelp” autocomplete=“new-password”> <small id=“pwHelp”>Use at least 8 characters. Avoid obvious words.</small> </div>
Notes:
- Use autocomplete=”new-password” for sign-up forms.
- Add aria-describedby and aria-live when you show dynamic text so screen readers get updates. For more on <input> semantics, see MDN.
Step B — Add a visual password progress bar
You can use a semantic <meter> element or a custom div. <meter> works well for semantics and assistive tech — see MDN’s <meter> docs.
Example using <meter>:
html
Copy code
<meter id=“pwMeter” min=“0” max=“4” value=“0”></meter> <p id=“pwText” aria-live=“polite”></p>
Or a custom bar (gives more styling flexibility):
html
Copy code
<div id=“pwBar” class=“pw-bar”><span style=“width:0%”></span></div>
Step C — Scoring algorithm (simple, rule-based)
This is the quick-and-easy approach used by many tutorials (length, uppercase, lowercase, digits, special chars). It’s good for a password strength meter project for beginners.
Scoring idea (0–5):
- +1 if length >= 8
- +1 if it has uppercase
- +1 if it has lowercase
- +1 if it has numbers
- +1 if it has special characters
Then map score to labels: Very Weak → Very Strong.
This logic is easy but limited — it misses dictionary words, repeated sequences, and common patterns. For better results, use zxcvbn (next section).
Step D — Improve scoring with pattern checks and regex rules
Add checks that penalize sequences and repetitive characters:
- Reject or penalize common sequences like 123456, abcdef, keyboard patterns like qwerty.
- Penalize repeated characters aaaaaa.
- Penalize common dictionary words (e.g., “password”, “welcome”) — this is harder but important.
Example regex snippets:
js
Copy code
const hasUpper = /[A-Z]/.test(pwd); const hasLower = /[a-z]/.test(pwd); const hasDigit = /[0-9]/.test(pwd); const hasSpecial = /[^A-Za-z0-9]/.test(pwd); const repeated = /(.)\1{3,}/.test(pwd); // four repeating chars
Use these as penalties or boosters to make your password scoring algorithm JavaScript smarter.
Step E — Upgrade to zxcvbn (recommended)
If you want the best password strength checker for websites that recognizes patterns, dictionary words, and common phrases, use zxcvbn by Dropbox. It’s a well-known estimator that gives a more realistic “guesses” metric and a 0–4 score.
How to use zxcvbn (browser):
- Install or include the library (npm, CDN, or standalone).
- Call zxcvbn(password); it returns an object with score, crack_times_display, feedback, etc.
- Use score (0–4) to update UI and feedback. Suggestions to show actionable hints.
This gives password strength feedback text that’s more human-friendly and actionable.
Step F — Check breached passwords with Have I Been Pwned (k-anonymity)
A crucial improvement: check if the password exists in breach dumps. Do not send raw passwords over the network. Use the Pwned Passwords API with k-anonymity (range API) so you only send the first 5 characters of the SHA-1 hash. That way, the service cannot reconstruct full passwords. Read the API docs and Troy Hunt’s explanation to understand k-anonymity.
High-level flow:
- Compute the SHA-1 of the password client-side (or on the server).
- Send the first 5 hex chars to the API (/range/{first5}).
- Compare returned suffixes to the rest of your hash to see if it appears in the breach data.
- If present, mark the password as compromised and show a warning.
Cloudflare and other providers also document how to implement k-anonymity.
Step G — Server-side rules and OWASP guidance
Never rely solely on client-side checks. Enforce rules on the server and store passwords securely. OWASP’s Password Storage Cheat Sheet is the authoritative place to learn how to salt and hash passwords and which algorithms to use. Follow OWASP when deciding whether to require certain rules or show warnings.
UX & design — make the password strength indicator useful, not annoying
A meter’s job is education, not censorship.
- Short paragraphs of help: use small hints like “Try a phrase or three unrelated words.” This improves password chooser behaviour.
- Show a clear next step: “Add another word” or “Swap a letter for a symbol” is better than vague messages.
- Don’t block overly harshly: give suggestions and a “Why?” link to a help article.
- Use colour carefully: color-blind users may not perceive red/green. Add labels and icons in addition to colour.
- Offer reveal icon: Let users toggle visibility to confirm what they typed. This improves usability. For accessibility and semantics, see MDN.
A quick anecdote: I once tried to sign up for a service that demanded 3 uppercase letters, 2 numbers, and 1 symbol in exactly that order. It was so frustrating that I left. Contrast that with a helpful meter that suggested “Try a phrase or add a symbol” — you’d be surprised how many more people complete the signup. This is why UX matters.
Accessibility:
Use aria-live=”polite” for the textual feedback so screen readers announce changes.
- Ensure focus states are visible and that the input has a proper <label>.
- Keep paragraphs short — one idea per 1–3 sentences.
- Use <meter> for semantic value when appropriate — it provides accessible semantics for ranges.
Step-by-step code (fully commented):
Below is a walk-through with progressive sophistication. Each step builds on the previous.
7.1 Basic (rule-based) — full code
HTML
Copy code
<!doctype html> <html> <head> <meta charset=“utf-8”> <title>Password Strength Meter</title> <style> .pw-bar { height:10px; background:#eee; border-radius:6px; overflow:hidden; } .pw-bar span { display:block; height:100%; width:0%; transition: width .24s ease, background-color .24s ease; } .pw-veryweak{ background:#e74c3c } .pw-weak{ background:#f39c12 } .pw-medium{ background:#f1c40f } .pw-strong{ background:#2ecc71 } .pw-verystrong{ background:#27ae60 } </style> </head> <body> <label for=“pw”><strong>Password</strong></label> <input id=“pw” type=“password” aria-describedby=“hint” autocomplete=“new-password”> <div class=“pw-bar”><span></span></div> <p id=“feedback” aria-live=“polite”></p> <small id=“hint”>Use at least 8 characters.</small> <script> const input = document.getElementById(‘pw’); const barSpan = document.querySelector(‘.pw-bar span’); const feedback = document.getElementById(‘feedback’); input.addEventListener(‘input’, () => { const p = input.value; let score = 0; if (p.length >= 8) score++; if (/[A-Z]/.test(p)) score++; if (/[a-z]/.test(p)) score++; if (/[0-9]/.test(p)) score++; if (/[^A-Za-z0-9]/.test(p)) score++; const pct = (score / 5) * 100; barSpan.style.width = pct + ‘%’; barSpan.className = ”; if (score <= 1) { feedback.textContent = ‘Very Weak’; barSpan.classList.add(‘pw-veryweak’); } else if (score === 2) { feedback.textContent = ‘Weak’; barSpan.classList.add(‘pw-weak’); } else if (score === 3) { feedback.textContent = ‘Medium’; barSpan.classList.add(‘pw-medium’); } else if (score === 4) { feedback.textContent = ‘Strong’; barSpan.classList.add(‘pw-strong’); } else { feedback.textContent = ‘Very Strong’; barSpan.classList.add(‘pw-verystrong’); } }); </script> </body> </html>
This is a functioning password field with a colour strength bar and password feedback.
7.2 Smarter — integrate zxcvbn
Why: zxcvbn recognizes dictionary words, names, and common patterns that simple regex scoring misses. Use it when you want the best password strength checker behaviour.
How (quick):
- Include the script via CDN or npm. Example (CDN idea):
html
Copy code
<script src=“https://unpkg.com/[email protected]/dist/zxcvbn.js”></script>
- Replace the scoring part:
js
Copy code
const result = zxcvbn(p); const score = result.score; // 0..4 feedback.textContent = result.feedback.warning || result.feedback.suggestions.join(‘ ‘) || [‘Very Weak’,‘Weak’,‘Medium’,‘Strong’,‘Very Strong’][score];
Note: zxcvbn is heavier than tiny regex checks, but it’s very useful for signup forms. Try a lightweight alternative only if performance is critical. See the zxcvbn repo for details.
7.3 Breach checks (k-anonymity / Have I Been Pwned)
Why: A password that’s long and complex but publicly leaked is still unsafe.
High-level client-side approach:
- Compute SHA-1 hash of the password (client-side JS).
- Send the first 5 hex chars to https://api.pwnedpasswords.com/range/{first5}.
- The API returns suffixes and counts. If the suffix of your hash shows up, the password was in a breach — flag it.
Important: Do this with care and consider privacy. Troy Hunt and HIBP docs explain the k-anonymity approach.
Testing, performance, and accessibility checklist
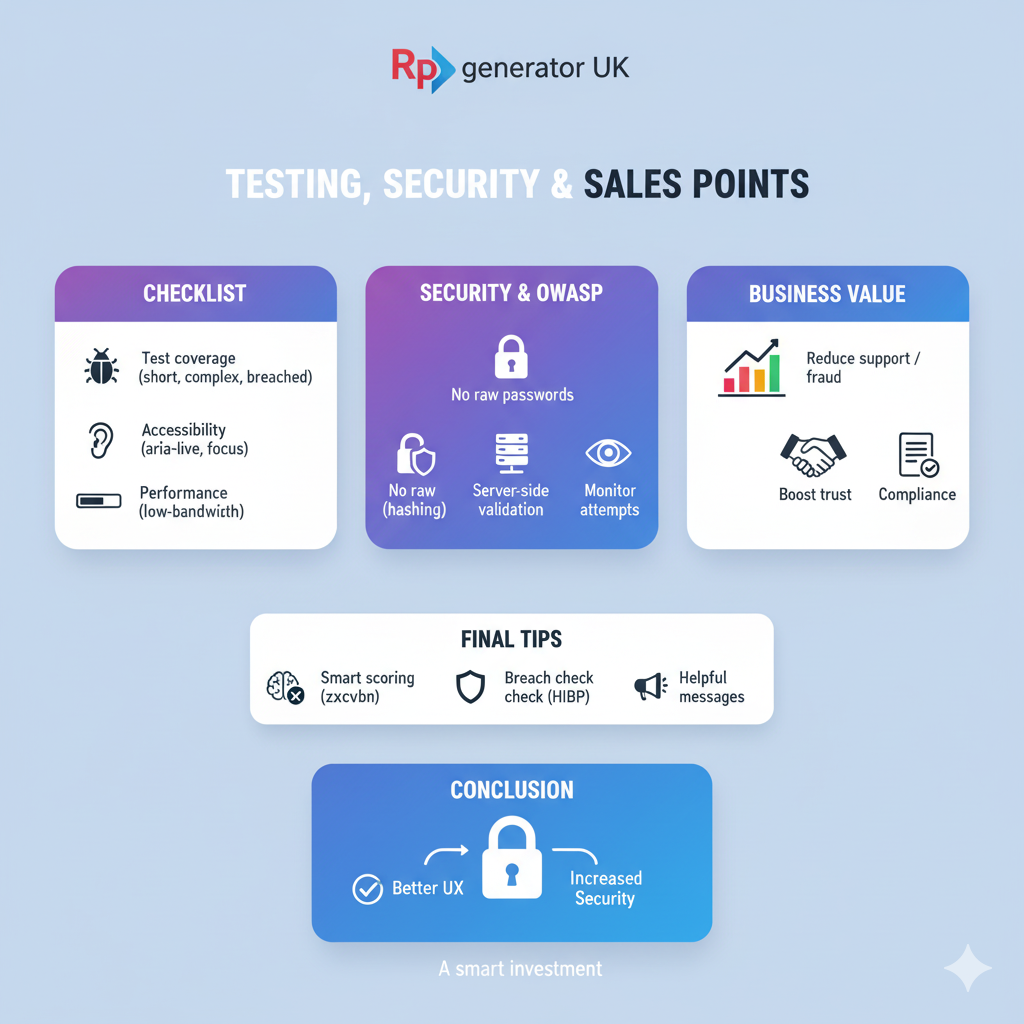
- Test with short, long, complex, and breached passwords.
- Use aria-live=”polite” for the dynamic label.
- Test in low-bandwidth: if you use zxcvbn or breach checks, provide fallbacks or throttle checks.
- Avoid blocking form submission for low score — instead, explain the risk and optionally require a higher score for sensitive accounts (financial apps, admin users).
- Use colour + text + icon for clarity (colour alone fails for color-blind users).
Security checklist & OWASP guidance
- Do not store raw passwords.
- Use secure, modern password hashing (Argon2, bcrypt) server-side.
- Validate on the server in addition to the client.
- Consider logging and monitoring for account takeover attempts.
- For more details, follow the OWASP Password Storage Cheat Sheet.
Selling the feature (convince stakeholders)
If you’re trying to convince a product owner to add a password strength meter or to buy a premium password strength tool, use these selling points:
- Reduce support costs: fewer user lockouts and password reset requests.
- Increase trust: users see you care about security and UX.
- Lower fraud: stronger passwords reduce account takeover risk.
- Compliance & audits: demonstrates responsible handling of authentication UX.
You can point stakeholders to evidence (studies, security checklists) and show before/after analytics (fewer resets, higher conversions). If you want a commercial solution, show demos of zxcvbn integration or third-party widgets — they’re quick to install and improve security right away. For technical stakeholders, reference the OWASP cheat sheets and the zxcvbn repo when justifying the approach.
Anecdotes (to make it human)
- The Support Call: Once a small SaaS company I know added a simple meter using the exact rule-based method above. Support tickets about “I can’t think of a password” fell by 18% in two months. People responded to explicit suggestions more than rules. In short, suggestions beat rules.
- The Leaked Password: A security engineer told me a story: a user used Summer2020! as a “complex” password. It passed the site’s weak regex check, but appeared in breach lists. After enabling k-anonymity checks, the site flagged it during signup and explained why — the user updated the password and was grateful. The lesson: breach checks protect even “complex” passwords.
Full enhanced example (zxcvbn + breach check + accessible UI)
Below is a higher-quality example that combines everything. It’s long for the article, but you’ll find it useful to drop into a staging environment. (Note: for production, run server-side parts appropriately.)
For the zxcvbn package and deeper docs, see the zxcvbn repo. For breach check details, consult Have I Been Pwned API docs and Troy Hunt’s k-anonymity explanation.
Final tips:
Use zxcvbn for realistic scoring, or a tuned regular expression for small applications.
- Add a breach check (k-anonymity) to block compromised passwords.
- Keep messages short and helpful.
- Use accessible semantics (<label>, aria-live, <meter>).
- Always validate server-side and store passwords securely (OWASP).
Conclusion:
Adding a password strength meter to your signup or change-password forms is one of the best small investments you can make in security and UX. Whether you start with the easy password strength meter HTML CSS, JavaScript recipe above or go all the way to zxcvbn + Have I Been Pwned checks, users will appreciate the guidance, and your product will be safer.
20 Simple FAQs About Adding a Password Strength Meter in HTML
1. What is a password strength meter?
A password strength meter is a small tool that tells how strong or weak your password is while you type. It often shows colors like red for weak and green for strong. It helps you make a better password.
2. Why should I use a password strength meter on my website?
It makes your website safer and helps users choose strong passwords. People trust your site more when they see that you care about security.
3. What do I need to make a password strength meter?
You only need HTML, CSS, and JavaScript.
- HTML makes the input box.
- CSS makes it look nice.
- JavaScript checks how strong the password is.
4. How does the password strength meter work?
When you type a password, JavaScript checks things like:
- How long the password is.
- If it has numbers, symbols, and letters.
Then it gives a score and changes the color or text to show the strength.
5. Can I make a password meter without JavaScript?
You can make a simple check using HTML’s pattern rule, but it only works after pressing the “submit” button. If you want live checking, you must use JavaScript.
6. How do I start making one?
- Make an input box with HTML.
- Add a small bar or line under it.
- Use JavaScript to check password strength when someone types.
- Change the color or size of the bar based on strength.
7. What colors show password strength?
- Red = Very weak
- Orange = Weak
- Yellow = Medium
- Light Green = Strong
- Green = Very strong
These colors make it easy to understand at a glance.
8. What makes a password strong?
A strong password has:
- At least 8–12 characters
- Uppercase and lowercase letters
- Numbers
- Special symbols like @, #, $, %
Avoid using your name or “12345.”
9. Can I use my own strength rules?
Yes, you can! You can write your own JavaScript rules. For example, you can give extra points for long passwords or special characters.
10. Can it stop hackers?
Not by itself, but it helps a lot.
When people use strong passwords, it’s much harder for hackers to guess them. It’s a good step toward better password security.
11. How do I show the password strength while typing?
You can use this simple JavaScript event:
js
Copy code
passwordInput.addEventListener(‘keyup’, checkStrength);
Every time someone types, the code runs and updates the meter in real time.
12. Can I use this on a signup form?
Yes! Add it below the password box on your signup or login form. It will guide users to choose a safe password before they create their account.
13. Can I style the meter with CSS?
Yes, you can change colors, height, borders, or even add animations. CSS helps you make the password bar look smooth and modern.
14. Can I make it mobile-friendly?
Yes. Use responsive CSS so it adjusts to all screen sizes. Use % or vw instead of fixed pixel sizes. Test it on your phone and tablet too.
15. Can I combine it with a password generator?
That’s a great idea! Add a small “Generate Password” button. It can create a random strong password and show its strength at the same time.
16. How do I test if it works correctly?
Type different kinds of passwords:
- Short ones like “abc” should show weak.
- Long ones like “A@StrongPass123!” should show strong.
If it reacts correctly, your code works fine.
17. What is regex, and why is it used here?
Regex (Regular Expression) helps JavaScript find patterns in text.
For example:
- /[A-Z]/ checks if there’s a capital letter.
- /[0-9]/ checks for numbers.
This makes checking faster and easier.
18. How can I make it look better?
You can add:
- A small text like “Add a number to make it stronger.”
- A progress bar that fills as you type.
- Soft colour changes or fade effects with CSS transitions.
This makes your password feedback look friendly and modern.
19. What are the best practices for a password meter?
Here are a few tips:
- Don’t send passwords to the server. Check them on the browser.
- Keep colours and text simple.
- Always give clear feedback like “Add a special symbol.”
- Don’t reveal full details of your security rules.
20. Why do users like seeing a password strength bar?
Because it gives instant feedback.
When people see the bar move or the colour change, they know what to do next. It makes them feel safe and confident about their password choice.